Configuring and sending email in Deacom
Microsoft will deprecate Exchange Web Services (EWS) on October 1st, 2026, which affects older email integration patterns. Supported Deacom versions use Microsoft Graph for Microsoft 365 OAuth2 email—not EWS. Customers who have not upgraded to at least 17.03.010 should plan an update to retain supported email functionality. After this change, customers who have not upgraded to at least 17.03.010 will lose the ability to send emails from Deacom.
What changed for Microsoft 365: For OAuth2 email, Deacom sends mail through Microsoft Graph instead of legacy Exchange Web Services (EWS). That is primarily a backend integration change. The main customer-facing follow-up for Microsoft is to ensure the Microsoft Entra ID (Azure AD) app registration uses Microsoft Graph API permissions—not legacy EWS permissions. Update Entra permissions as detailed in the Microsoft sections below.
What changed in the product (UI and configuration): System > Options > Email now includes Email Provider (Microsoft, Gmail, or Other). The provider you select controls which fields on the Email tab are enabled, disabled, and required—only the options that apply to that provider should be used. Existing fields such as Outlook Authentication Type, Outlook App ID, Outlook Tenant ID, Outlook Secret, and (where applicable) Email Host / Email Port still apply, but their relevance depends on Email Provider and on Basic versus OAuth2. Per-user values continue to be maintained under Main Menu > User icon > Email Settings.
Important Upgrade Note: The Email Provider field, in System > Options, defaults to Microsoft upon upgrading to 17.03.010.0003. If you use a non-Microsoft provider, you must update this setting immediately after the upgrade to ensure uninterrupted email service.
The use of email features in Deacom is optional. The following email options are available:
- Email documents and files that have been attached to various Deacom records.
- Email lot information via lot implosion reports to contacts indicated on Ship-To records. This is very useful in the event of product recalls.
- Create/sync contacts located in the CRM section of Deacom with a user's MS Outlook account.
- Email information based on Trigger conditions and setups. Trigger emails are separate from the other email options in Deacom and have their own separate fields and configuration steps. This page deals with the three options listed above. See the Configuring Triggers page for details on using email with Triggers.
Email Configuration Overview
Email configuration starts with Email Provider on the System > Options > Email tab. That choice determines whether you follow Microsoft Graph, Gmail API (Google OAuth2), or SMTP-style (Other) instructions below.
After the provider is set, define the authentication type and populate email user, email password, and other related information as required for that provider.
There are two authentication types offered in Deacom: Basic and OAuth2. OAuth2 is designed to provide an additional layer of authentication.
- With Basic authentication companies can use the first two features in the above list: 1. email documents and files, and 2. email lot information from lot implosion reports.
- With OAuth2 authentication companies can use the first two features in the above list and the sync contacts in the CRM feature. (where licensed and configured).
Basic authentication setup
Use this section when Email Provider is Other (SMTP using Email Host and Email Port), or when Email Provider is Microsoft and you intentionally use legacy SMTP-style delivery with Outlook Authentication Type set to Basic. When Email Provider is Gmail and your organization requires Google OAuth2, use Gmail (Google) OAuth2 setup instead of Basic SMTP.
- Fill out all the fields indicated in the sections below.
In System > Options > Email tab
- Outlook Authentication Type: Ensure "Basic" is set in this field when using Basic SMTP with a Microsoft-related provider path. Basic supports many SMTP email hosts (for example Mailgun or relay servers). For Google-hosted mailboxes that mandate OAuth2, use the Gmail OAuth section.
- Email Host - Defines the SMTP server name used for the default email host. Example: mail.company.com
- Email Port - Defines the port for the default email host. Example: 25.
In Main Menu > User Icon > Email Settings
- Email - indicates the email (MS Outlook, Gmail, etc.) address of the user currently logged in, i.e. "[email protected]". This email must be registered on the email server/service defined in System > Options.
- Email User - If using Office 365, the "Email User" field must match the email address entered in the "Email" field above, i.e. "[email protected]". If using an internal exchange server, the "Email User" field must be the domain login name or the Outlook User name, i.e. "jsmith" (outlook) or "companyhq\jsmith" (domain).
- Email Password - The "Email Password" is the password of the email user in the field above. This may or may not be the same as the password used to log on to your computer/network.
Notes:
- The remaining fields on the Email Settings form are optional.
- The Email Setting section above will need to be completed for each user that will email from Deacom.
OAuth2 authentication setup
Choose the subsection that matches Email Provider on System > Options > Email tab:
- Microsoft (default): Follow Setting up Microsoft Entra ID (Azure AD), Setting up Azure for secrets (if used), and Configuring Deacom for Azure email SSO below.
- Gmail: Follow Gmail (Google) OAuth2 setup below, then complete the Gmail fields in Configuring Deacom for Gmail OAuth2.
Gmail (Google) OAuth2 setup
Customers will most likely need to coordinate with their IT department for this step. These steps summarize the Google Cloud side so that Deacom can send mail through the Gmail API using OAuth2. Exact Google Cloud console labels can change; use Google's current documentation if a screen differs.
Prerequisites
- In Deacom, set Email Provider to Gmail on System > Options > Email tab before expecting Gmail OAuth fields to apply.
- Administrative access to Google Cloud Console for your organization (often the same team that manages Google Workspace).
- A clear list of every Deacom site URL users use (production, test, training), for example https://yourcompany.deacom.com, because OAuth clients restrict which redirect origins are allowed.
Google Cloud project, APIs, and OAuth client
- In Google Cloud Console, create or select a project that will own the OAuth client used by Deacom.
- Open APIs & Services > Library and enable the APIs Deacom uses for Gmail-based email and related features, including at minimum the Gmail API. Depending on licensed features (for example CRM contact sync), your tenant may also require Google People API and Google Calendar API. If you are unsure which APIs apply, work with your implementation team or support.
- Configure the OAuth consent screen (APIs & Services > OAuth consent screen): set user type (internal or external) appropriate to your Workspace, add app information, and add the OAuth scopes your organization approves. Gmail and related scopes can be classified as sensitive or restricted by Google; plan for admin review or verification if Google requires it.
- Under APIs & Services > Credentials, create an OAuth 2.0 Client ID. The client type must match how Deacom completes the browser-based consent flow in your environment (commonly Web application). Record the Client ID and Client secret.
- Add Authorized redirect URIs (and any related authorized JavaScript origins your Google security model requires) so that they match the way users reach each Deacom environment. Use the same discipline as Microsoft Entra redirect URIs: each Deacom base URL that will send Gmail OAuth email should be represented. Missing URIs typically produce "redirect_uri_mismatch" or similar errors during consent.
Redirect URI alignment with Deacom: The value you register in Google Cloud must match the browser address users use to log into Deacom for that environment (scheme, host, and path rules as required by Google's client type). If you add a new Deacom URL later, add the corresponding redirect entry in Google Cloud and retest.
Scopes: Deacom's Gmail integration requests Google OAuth scopes that cover sending mail and, where features are used, mailbox, contacts, and calendar access. Your consent screen and admin approvals should allow the scopes your Deacom version and modules require; confirm with support if you need an exact list for audit.
Configuring Deacom for Gmail OAuth2
After Google Cloud is prepared, enter or verify the following in Deacom. Save System > Options after changes.
In System > Options > Email tab (with Email Provider set to Gmail):
- Outlook Authentication Type: Set to OAuth2 when using Gmail API delivery (not Basic SMTP).
- Outlook App ID: Enter the Google OAuth Client ID from the Google Cloud credential created above.
- Outlook Secret: Enter the Google OAuth Client secret from the same credential.
- Outlook Tenant ID: Complete this field only when your implementation or support documentation requires a value for Gmail (for example certain service-account or tenant-specific setups). If your project does not use this field for Google OAuth, it may be left blank when the form allows—confirm with your implementation team if the field is enforced as required.
In Main Menu > User Icon > Email Settings:
- Email: The user's Gmail or Google Workspace mailbox address that will send mail.
- Email User / Email Password: Behavior follows the same OAuth patterns described for Microsoft OAuth2 in Configuring Deacom for Azure email SSO—when OAuth2 is active at the system level, per-user password fields may be unused for routine sending and tokens are managed by the system. If a send fails for missing consent, the user may need to complete a Google permission prompt and retry, similar to the Microsoft test-send flow.
User-initiated email versus Trigger email: Interactive email from users relies on consent and tokens obtained in context. Trigger email runs unattended and typically requires appropriately configured application credentials and secrets on the trigger profile—see Configuring Triggers and ensure trigger-related OAuth fields match your provider (Google or Microsoft) per that documentation.
Troubleshooting (Gmail)
- Verify Email Provider is Gmail and required OAuth fields are populated after upgrade (the provider defaults to Microsoft on some upgrades—see the Important Upgrade Note at the top of this topic).
- Confirm Google Cloud Authorized redirect URIs include every Deacom URL in use.
- Confirm required Google APIs are enabled and the OAuth consent screen is published or test users are added during pilot.
- For permission or scope errors, re-run a simple send from Deacom, capture the Google error text, and involve your Google Workspace admin and Deacom support as needed.
Setting up Microsoft Entra ID (Azure AD)
Customers will most likely need to coordinate with their IT department for this step. The screens below are taken from an in house system used for demo purposes; your Entra screens may differ slightly.
- Navigate to the Microsoft Entra admin center (from Microsoft 365 admin or https://entra.microsoft.com / https://portal.azure.com).
- When opening the portal for the first time, you may land on the home page. Use the search box at the top of the screen and type App registrations.
- Click App registrations. You should be presented with a screen similar to the one below.
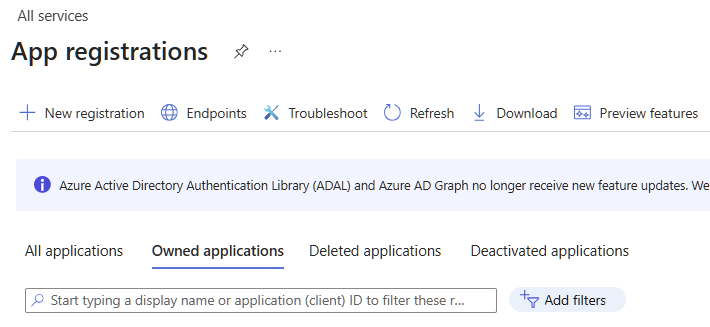
- Click New registration in the top left of the menu.
- Enter information as below:
- In the Name field, enter the desired name for the application. The name is not used by Deacom code, but it helps IT identify that the app is for Deacom.
- In Supported account types, select the option that indicates Single tenant only.
- In the Redirect URL section* - select Single-page application (SPA) and then next add the URL/link of the Deacom system you are using. For customers, this will be their test and/or production systems. Example syntax: https://yourcompany.deacom.com
- *In Azure the Redirect URL option is listed as optional but is required for the Deacom setup.
- Your screen should now look similar to one below.
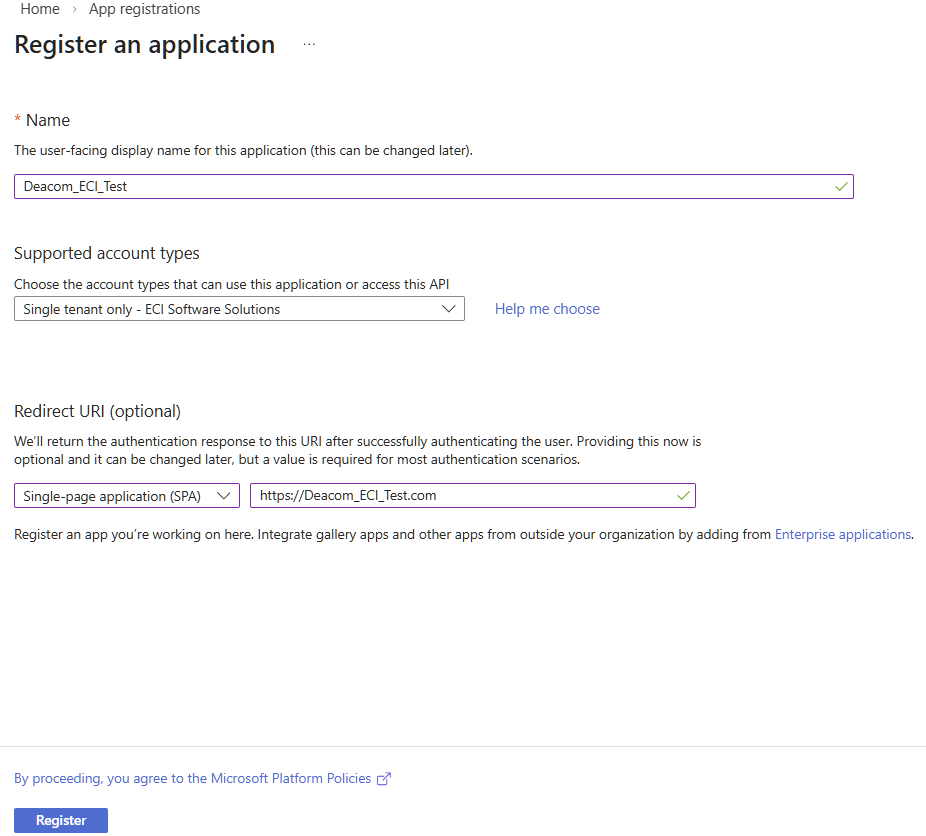
- Next, click Register at the bottom of the screen.
- You will be presented with a screen similar to the one below.
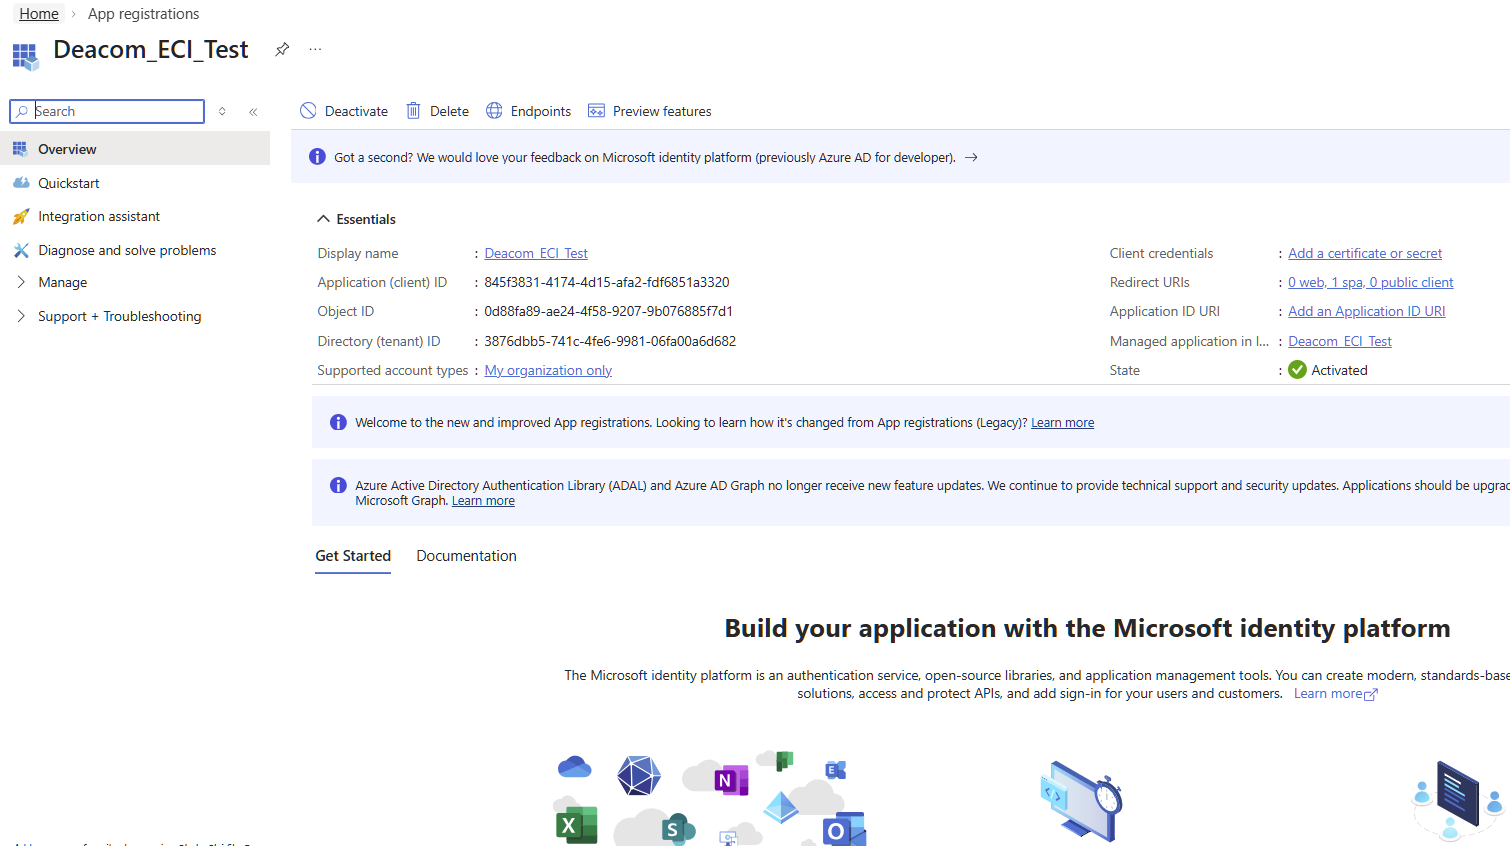
- From the screen above copy the Application (client) ID and the Directory (tenant) ID and paste them into the Outlook App ID and Outlook Tenant ID fields respectively in the System > Options > Email tab area of Deacom as seen in the screen below. Once you are done hit the Save button.
- Verify the redirect URL is correct. Click on the Manage option on the left hand menu or use the search bar to go to the Authentication section. Verify the Redirect URL that was configured earlier in these instructions is displayed and that each SPA redirect URL for your Deacom environments exists.
- Setting up API Permissions. Deacom uses Microsoft Graph for OAuth2 email (not Exchange Web Services). Your Entra app must include the correct Microsoft Graph delegated (and if applicable, application) permissions for your scenario—for example, sending mail and, if you use email monitoring or related features, reading mailbox content. Exact permissions can depend on your Deacom version and which features you use; work with your implementation team or support if you are unsure. On the left hand menu (under the Manage folder/option) there is an option for API PermissionsYou can add permissions in the portal, or users may be prompted to consent the first time they send email. A common approach is to complete a test send from Deacom and accept the Microsoft permission prompt when it appears:
- Log on to the Deacom site that uses this app registration. (If you are already logged in, please refresh the browser where the Deacom system is running to ensure the System > Options changes from above are applied.)
- Select one of the various options in Deacom to email an attachment. For example:
- Navigate to Print Outs > Picking Lists.
- Select a pick list and click Print One on the toolbar.
- On the Copies To Print form select Email from in the Print To field and click Print.
- The Send Email form will be displayed. Enter an appropriate email address in the To field and click Send Email.
- You will be presented with a screen similar to below. You should recognize the email account as the one setup previously.
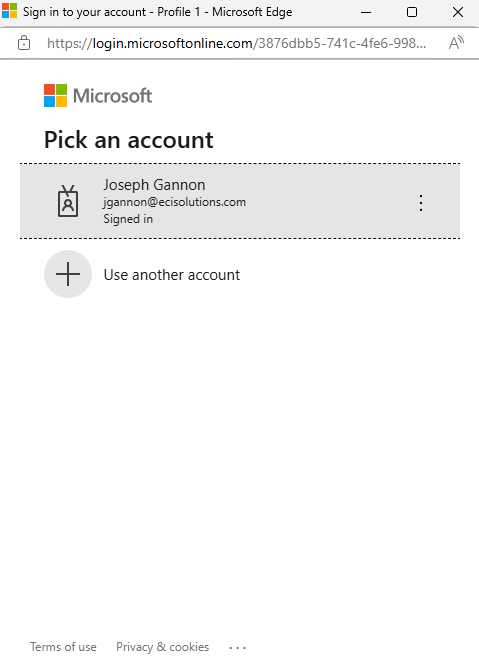
- Select the appropriate email account.
- You will be presented with the screen below requesting the appropriate API Permissions.
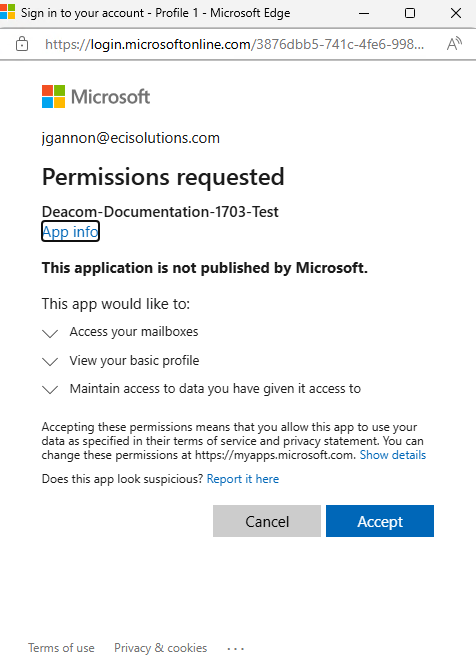
- Click Accept (You may be presented with this screen again)
- Allow the system to process the email.
- Verify the email was sent to the correct email address.
- The process is complete.
Troubleshooting: If email fails after upgrading, verify the Entra app uses Microsoft Graph permissions and admin consent as required by your tenant. Do not use the legacy Exchange Web Services connectivity test in Microsoft Remote Connectivity Analyzer as proof that Graph mail is configured; instead, confirm app registration settings, permissions, mailbox licensing, and Microsoft 365 health.
The following URL may be helpful in validating your connection to see if any issues are Deacom related or MS Exchange issues: https://testconnectivity.microsoft.com/tests/O365EwsTask/input
Setting up Azure for secrets
Customers will most likely need to coordinate with their IT department for this step. The screens below are taken from an in house system used for demo purposes.
There is another way to authenticate by using secrets which has become popular. If this option is selected, the authentication process is handled in the background (based on configuration in the Azure admin center) and does not require interaction or email credentials to be entered when sending emails from Deacom.
- Ensure all the steps in the Setting up Microsoft Entra ID (Azure AD) section above have been completed.
- In the Entra/Azure admin center, on the left hand menu (under the Manage option/folder) click the Certificates & secrets option.
- Select the +New client secret option.
- Enter a description for the secret and expiration time frame in the Expires field. (Note that IT administrators will need to be aware of this time frame so they may add/update the secrets and expiration details)
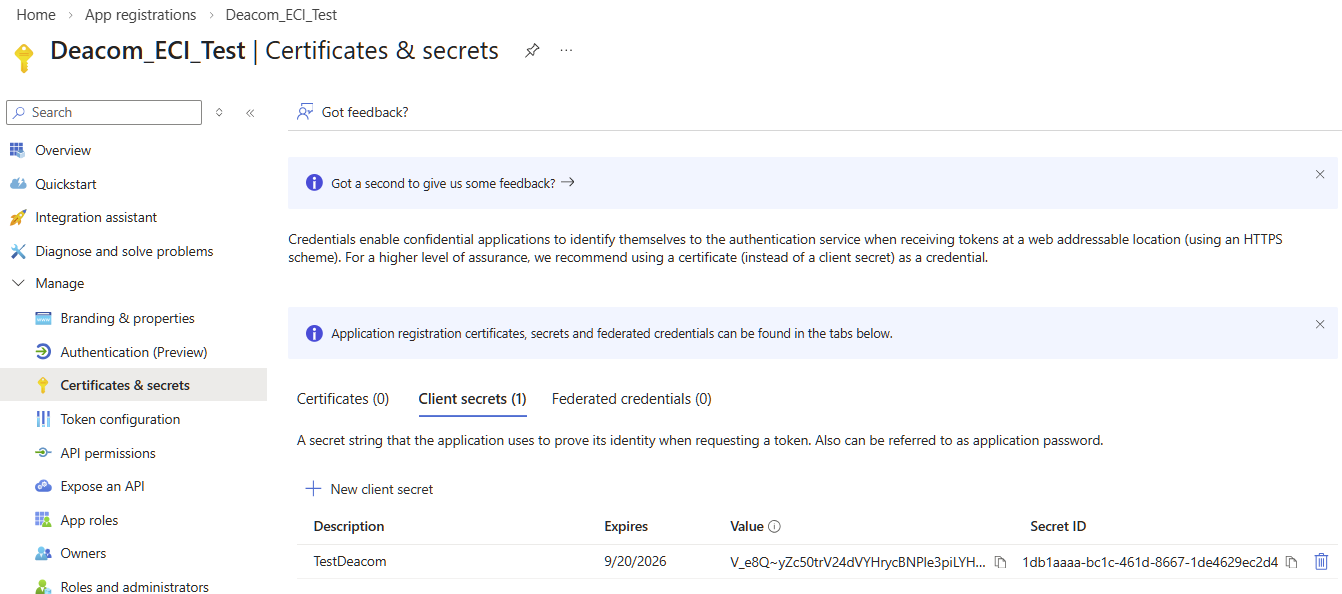
- Click Add. Your screen should look similar to the one below. Do not leave or refresh this page and continue with the steps below. The secret value will only be visible once.
- Copy the information in the Value field, not the Secret ID field and place that in the Outlook Secret field in the Deacom system via System > Options > Email tab. Be sure to save your changes in Deacom.
- Back in Azure/Entra, click on API Permissions on the left hand menu.
- Click Add a permission.
- On the Request API Permissions form, click APIs my organization uses.
- In the filter box at the top type Microsoft Graph.
- Click Microsoft Graph.
- Click the Delegated permissions option.
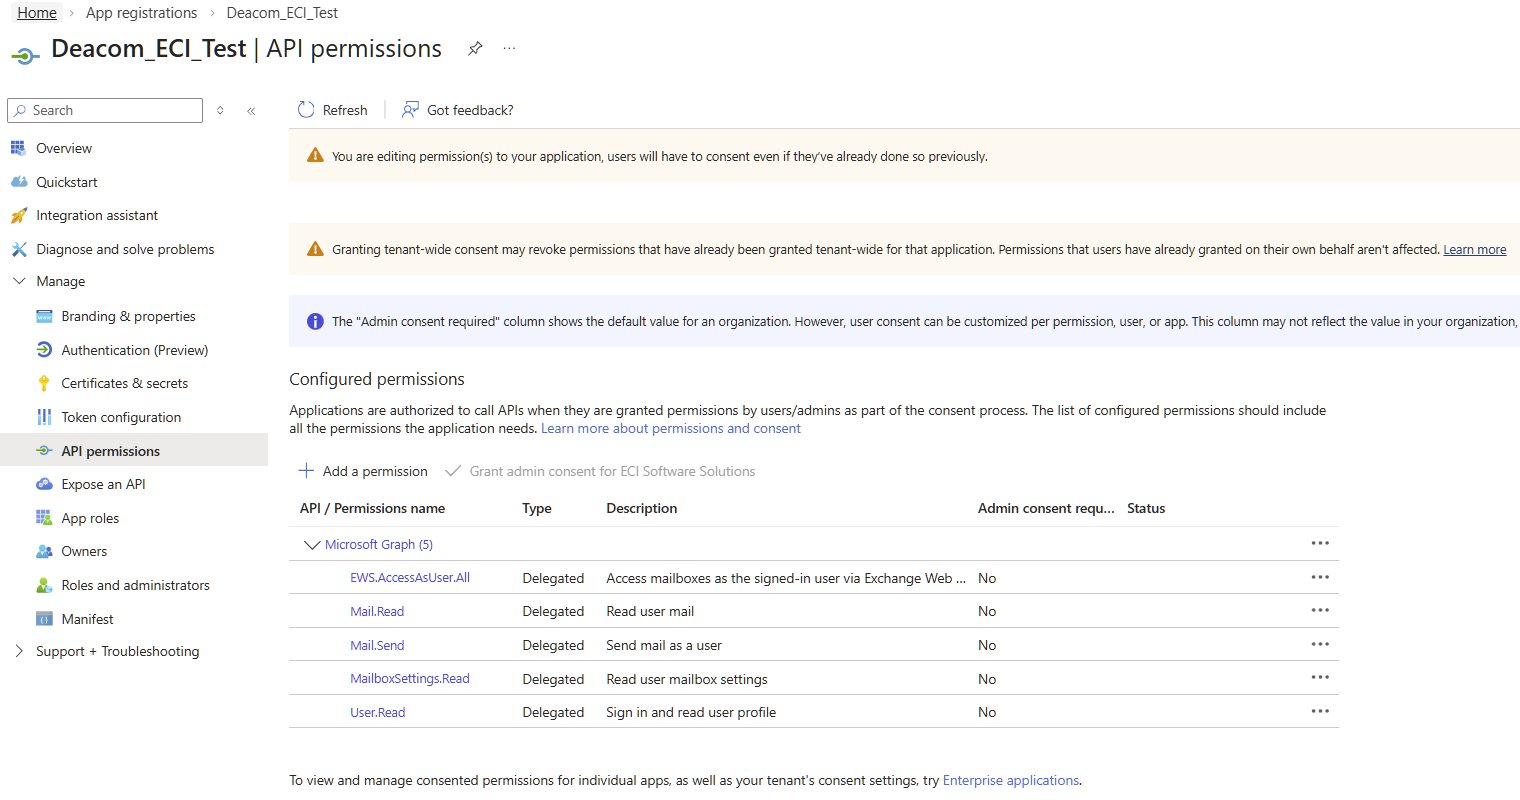
- You will need to select the five permissions below. You may do this by expanding the corresponding option or by typing the API permission in the Select permissions search bar at the top.
- EWS.AccessAsUser.All
- Mail.Send
- Mail.Read
- MailboxSettings.Read
- User.Read
- Click Add Permission each time. Once all the permissions have been selected and added, your screen should look similar to the one below
- After these changes have been made in Azure, you will need to refresh the browser where the Deacom system is running to ensure the changes have been applied.
Configuring Deacom for Azure email SSO
When Email Provider is Microsoft, use this section. Once Azure is setup enter or verify the information in the Deacom fields listed below. Be sure to save after you have entered information.
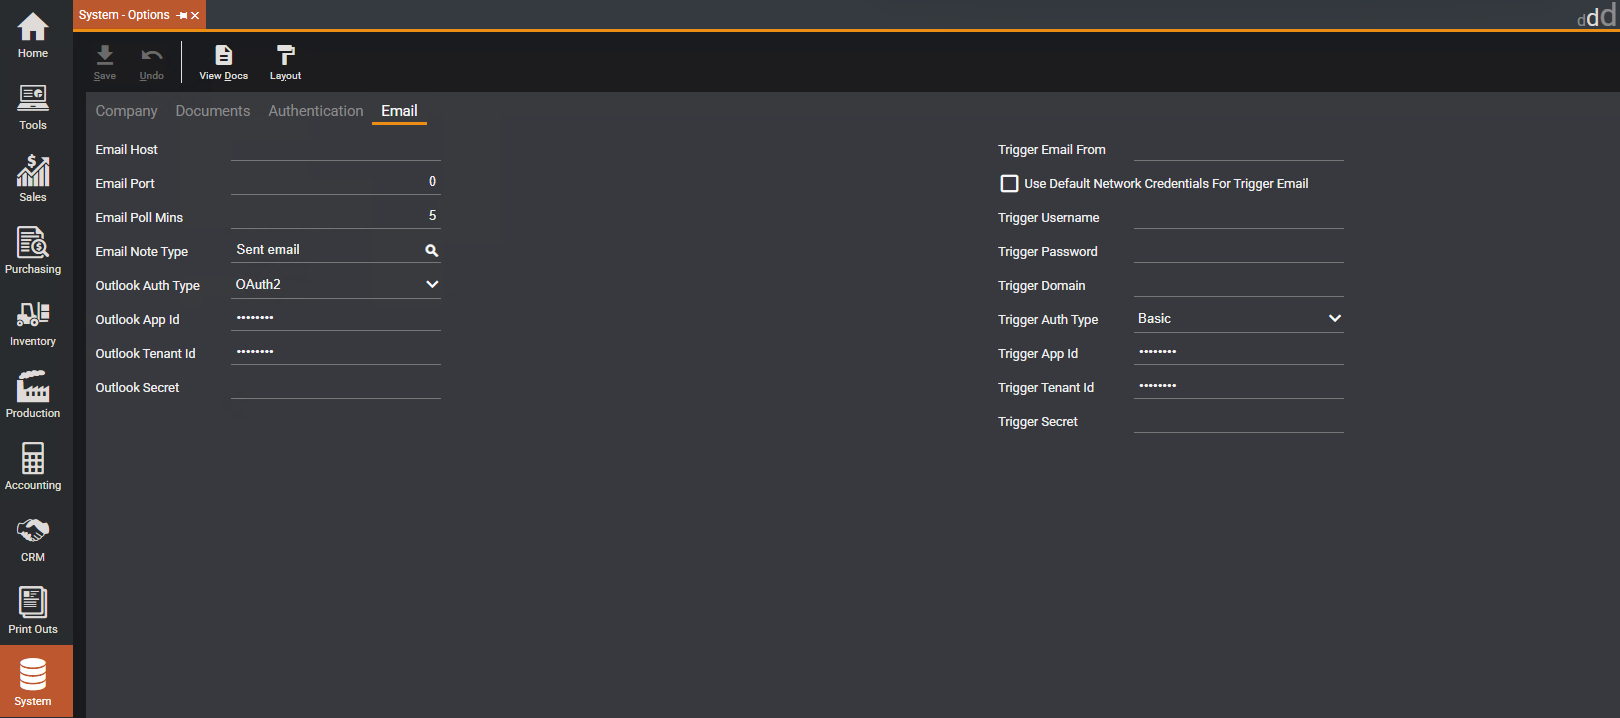
In System > Options > Email tab
- Outlook Authentication Type: Ensure OAuth2 is selected in this field for Microsoft 365 email sent through Microsoft Graph as configured above.
- Outlook App ID - When you setup Azure you will populate this field, so the Azure setup must be done first
- Outlook Tenant ID- When you setup Azure you will populate this field, so the Azure setup must be done first.
- Outlook Secret - Optional. When you setup Azure you will populate this field, so the Azure setup must be done first.
In Main Menu > User Icon > Email Settings:
The email information below is the email associated with the Azure account.
- Email -required.
- Email Userrequired.
- Email Passwordnot required
Notes:
- The remaining fields on the Email Settings form are optional.
- The Email Setting section above will need to be completed for each user that will email from Deacom.
Additional Notes
- Sending emails in Deacom - Emails can be sent from within Deacom from multiple locations and within multiple forms. The two most common locations/forms that offer the ability to send email are:
- The Documents form, which is accessed via the View Docs* button located on multiple records and maintenance tabs within DEACOM. The Documents form is used to both upload documents and email those documents via the "Send Email" button.
- The "Send Email" button on lot implosion reports in Inventory Reporting.
- Single Sign-On Methods - Single sign-on methods are separate from email configuration and use in Deacom and not required. However, companies will often utilize the features of Single Sign-On Methods in Deacom.
- Token Storage/Creation for OAuth2 - The system was enhanced
- Testing Azure SSO and emailing in multiple Deacom systems. Users may wish to setup more than one URL (representing a Deacom system) so they can test Azure SSO email configuration and setup. To do this, go to the "Authentication" section in the Azure admin site and click the "Add a platform" button to add as many add as many URL (Deacom systems) as desired. Note that in each of those Deacom systems you will still need to perform the Azure setup and configuration listed in steps 1-17 above.